MLP手写体识别示例及分析

目前深度学习的训练采用了mxnet框架,接下来会从具体的应用示例出发,详细分析深度学习的具体流程和一些trick,在示例分析中穿插相关概念的介绍。

MXNet简介

mxnet是一个开源的深度学习框架,它可以使你能自行定义、训练、配置和部署深度人工神经网络,并且适用于从云端到移动端诸多不同的设备上。可快速模型训练、灵活支持各种编程模型和语言使得mxnet具有高度的可扩展性。同时,它还允许混合使用命令式与符号式编程以最大化程序的效率和性能。具体mxnet的底层实现以及同caffe、tensorflow、theano框架对比如下:


目前facebook最新发布caffe2同样支持移动端部署,具体mxnet设计和实现简介可参考官方文档https://github.com/dmlc/mxnet/issues/797?url_type=39&object_type=webpage&pos=1

MLP手写体识别示例分析

接下来详细介绍下基于mxnet框架的mnist手写体识别,事实上在mxnet/example/image-classification/下已经存在了train_mnist.py的样例,但其分散依赖了其他文件,这里在train_mnist.py的基础上进行了重构,具体github地址为https://github.com/dreamocean/mnist,工程结构如下:

1
2
3
train.py —— 模型训练
predict.py —— 结果预测
feature.py —— 输出每层特征

模型训练

数据准备

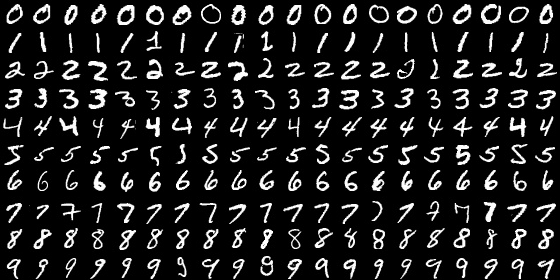
mnist数据显示如下:

不过官方给出的为二进制数据,具体读取方式如下:

1
2
3
4
5
6
7
8
9
10
11
12
13
14
15
16
17
18
19
20
21
22
23
24
25
26
27
28
29
30
31
32
def read_data(label, image):
with gzip.open(os.path.join('data',label)) as flbl:
magic, num = struct.unpack(">II", flbl.read(8))
label = np.fromstring(flbl.read(), dtype=np.int8)
with gzip.open(os.path.join('data',image), 'rb') as fimg:
magic, num, rows, cols = struct.unpack(">IIII", fimg.read(16))
image = np.fromstring(fimg.read(), dtype=np.uint8).reshape(len(label), rows, cols)
return (label, image)
def to4d(img):
#转成4维矩阵(标签个数*图像通道数量*图像宽*图像高)
return img.reshape(img.shape[0], 1, 28, 28).astype(np.float32)/255
def get_mnist_iter(args, kv):
(train_lbl, train_img) = read_data('train-labels-idx1-ubyte.gz', 'train-images-idx3-ubyte.gz')
(val_lbl, val_img) = read_data('t10k-labels-idx1-ubyte.gz', 't10k-images-idx3-ubyte.gz')
#输出训练数据和验证数据大小
print "val_label_len:%d val_img_data_len:%d train_label_len:%d train_img_data_len:%d"%(len(val_lbl),len(val_img),len(train_lbl),len(train_img))
#构建数据迭代器,为神经网络提供数据
train = mx.io.NDArrayIter(
data = to4d(train_img),
label = train_lbl,
batch_size = args.batch_size,
#是否将训练数据打乱
shuffle = True
)
val = mx.io.NDArrayIter(
data = to4d(val_img),
label = val_lbl,
batch_size = args.batch_size
)
return (train, val)

训练数据、验证数据和测试数据的划分方式:

  • 像sklearn一样,提供一个将数据集切分成训练集和测试集的函数(默认是把数据集的75%作为训练集,把数据集的25%作为测试集);
  • 在机器学习领域中,一般需要将样本分成独立的三部分训练集(train set),验证集(validation set ) 和测试集(test set)。其中训练集用于模型构建,验证集用来辅助模型构建,如进一步网络调参,而测试集用于评估模型的准确率,绝对不允许用于模型构建过程,否则会导致过渡拟合。一个典型的划分是训练集占总样本的50%,而其它各占25%,三部分都是从样本中随机抽取;
  • 当样本总量少的时候,上面的划分就不合适了。常用的是留少部分做测试集,然后对其余N个样本采用K折交叉验证法(一般取十折交叉验证),具体流程为:将样本打乱,然后均匀分成K份,轮流选择其中K-1份训练,剩余的一份做验证,计算预测误差平方和,最后把K次的预测误差平方和再做平均作为选择最优模型结构的依据,特别的K取N时,就是留一法(leave one out)。
网络模型构建
1
2
3
4
5
6
7
8
9
10
11
12
13
14
15
16
17
18
19
#构建含三层全连接层的MLP
def get_symbol(num_classes=10, **kwargs):
#创建一个用于输入数据的PlaceHolder变量(占位符)
data = mx.symbol.Variable('data')
#将data四维矩阵转化为二维(bathsize,通道数*宽*高)
data = mx.sym.Flatten(data=data)
#第一层全连接层,输入数据为data,含128个节点
fc1 = mx.symbol.FullyConnected(data = data, name='fc1', num_hidden=128)
#为第一层全连接层设定一个Relu激活函数,输入数据为fc1
act1 = mx.symbol.Activation(data = fc1, name='relu1', act_type="relu")
fc2 = mx.symbol.FullyConnected(data = act1, name = 'fc2', num_hidden = 64)
act2 = mx.symbol.Activation(data = fc2, name='relu2', act_type="relu")
fc3 = mx.symbol.FullyConnected(data = act2, name='fc3', num_hidden=num_classes)
#对输入的数据执行softmax变换,并且通过利用logloss执行BP算法
mlp = mx.symbol.SoftmaxOutput(data = fc3, name = 'softmax')
shape = {"data":(64, 1, 28, 28)}
#打印出网络模型,生成pdf
mx.viz.plot_network(symbol=mlp, shape=shape).view()
return mlp

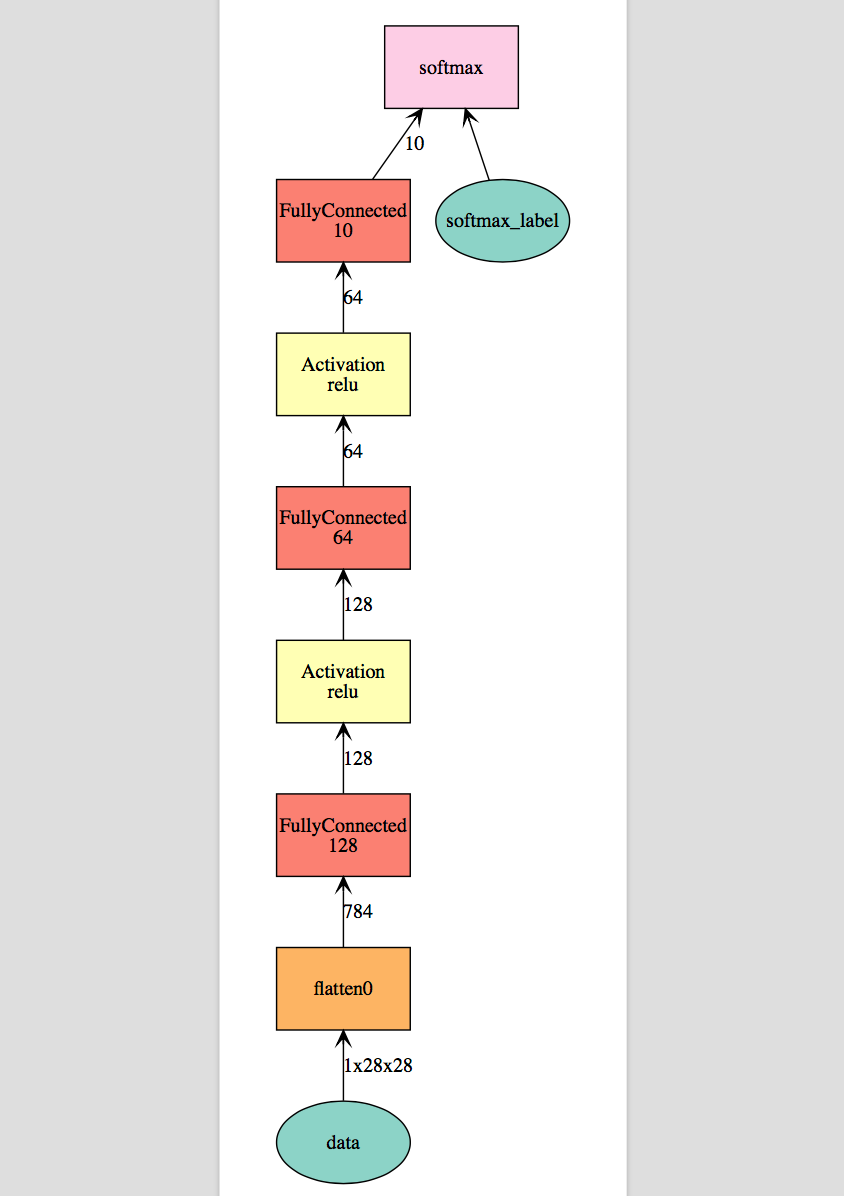
如上所述,通过声明式的符号表达式构建了一个多层感知器模型,具体网络结构如下:

训练模型
1
2
3
4
5
6
7
8
9
10
11
12
13
14
15
16
17
18
19
20
21
22
23
24
25
26
27
28
29
30
31
32
33
34
35
36
37
38
39
40
41
42
43
44
45
46
47
48
49
50
51
52
53
54
55
56
57
58
59
60
61
62
63
64
65
66
67
68
69
70
71
72
73
74
75
76
77
78
79
80
81
82
83
84
85
86
87
88
89
90
def main():
#加载之前构建的网络结构
symbol_net = get_symbol(**vars(args))
#创建键值对存储
kv = mx.kvstore.create(args.kv_store)
# data iterators
(train, val) = get_mnist_iter(args, kv)
arg_params, aux_params = (None, None)
if(args.retrain):
sym, arg_params, aux_params = _load_model(args, kv.rank)
# save model
checkpoint = _save_model(args, kv.rank)
# devices for training
devs = mx.cpu() if args.gpus is None or args.gpus is '' else [mx.gpu(int(i)) for i in args.gpus.split(',')]
# 当前学习率和学习率衰减流程
lr, lr_scheduler = _get_lr_scheduler(args, kv)
# 基于Module来创建网络模型
model = mx.mod.Module(
context = devs,
symbol = symbol_net
)
#优化器参数
optimizer_params = {
'learning_rate': lr,
'momentum' : args.mom,
'wd' : args.wd,
'lr_scheduler' : lr_scheduler
}
#权重初始化
initializer = mx.init.Xavier(rnd_type='gaussian', factor_type="in", magnitude=2)
# evaluation metrices
eval_metrics = ['accuracy']
#处理完每个batch_size数据后执行回调函数
batch_end_callbacks = [mx.callback.Speedometer(args.batch_size, args.disp_batches)]
#数据拟合,训练模型
model.fit(
train_data = train,
eval_data = val,
eval_metric = eval_metrics,
begin_epoch = args.load_epoch if args.load_epoch else 0,
num_epoch = args.num_epochs,
kvstore = kv,
optimizer = args.optimizer,
optimizer_params = optimizer_params,
initializer = initializer,
arg_params = arg_params,
aux_params = aux_params,
batch_end_callback = batch_end_callbacks,
#每次训练完所有数据后,执行checkpoint回调函数(保存当前参数)
epoch_end_callback = checkpoint,
allow_missing = True)
if __name__ == '__main__':
# parse args
parser = argparse.ArgumentParser(description="train mnist")
#总的类别数量
parser.add_argument('--num-classes', type=int, default=10, help='the number of classes')
#训练样本数量
parser.add_argument('--num-examples', type=int, default=60000,help='the number of training examples')
#训练使用的GPU列表
parser.add_argument('--gpus', type=str, default =None, help='list of gpus to run, e.g. 0 or 0,2,5. None means using cpu')
#键值对存储类型,单台机器训练可设为'local'/'device',分布式训练可设为'dist_sync'等
parser.add_argument('--kv-store', type=str, default='local', help='key-value store type')
#训练次数
parser.add_argument('--num-epochs', type=int, default=10, help='max num of epochs')
#学习率
parser.add_argument('--lr', type=float, default=0.05, help='initial learning rate, e.g. 0.01,0.05,0.1,0.2')
#学习率每个步长的衰减比例
parser.add_argument('--lr-factor', type=float, default=0.1, help='the ratio to reduce lr on each step')
#学习率发生变化的步长大小(一步为多少个训练次数后做一次衰减)
parser.add_argument('--lr-step-epochs', type=str, default='10', help='the epochs to reduce the lr, e.g. 10,30,60')
#优化方法类型,sgd or Adam
parser.add_argument('--optimizer', type=str, default='sgd', help='the optimizer type')
#优化方法为sgd时,动量大小
parser.add_argument('--mom', type=float, default=0.9, help='momentum for sgd')
#优化方法为sgd时,权重衰减大小
parser.add_argument('--wd', type=float, default=0.0001, help='weight decay for sgd')
#每次训练数据的数量
parser.add_argument('--batch-size', type=int, default=64, help='the batch size, e.g. 16,32,64,128')
#训练多少个bath后显示当前进度,如训练准确性
parser.add_argument('--disp-batches', type=int, default=100, help='show progress for every n batches')
#保存训练模型路径,mnist为名称前缀,如mnist-0001.params,mnist-symbol.json
parser.add_argument('--model-prefix', type=str, default='./model/mnist', help='model prefix')
#如果之前训练停止了,是否继续训练
parser.add_argument('--retrain', type=bool, default=False, help='true means continue training from load-epoch')
#加载之前训练的模型
parser.add_argument('--load-epoch', type=int, default=0, help='load the model on an epoch using the model-load-prefix')
args = parser.parse_args()
logging.info('arguments %s', args)
main()

训练模型时涉及到学习率、动量和batch_size等几个重要参数的设置,具体可参考上篇文章《深度学习中基于梯度的优化方法https://dreamocean.github.io/2017/06/12/sgd/
,训练输出如下:

1
2
3
4
5
6
7
8
9
10
11
12
13
14
15
使用CPU训练:
INFO:root:Epoch[9] Batch [100] Speed: 22635.80 samples/sec Train-accuracy=0.993193
INFO:root:Epoch[9] Batch [200] Speed: 19002.15 samples/sec Train-accuracy=0.989375
INFO:root:Epoch[9] Batch [300] Speed: 21092.46 samples/sec Train-accuracy=0.990313
INFO:root:Epoch[9] Batch [400] Speed: 21074.67 samples/sec Train-accuracy=0.991406
INFO:root:Epoch[9] Batch [500] Speed: 20138.39 samples/sec Train-accuracy=0.992188
INFO:root:Epoch[9] Batch [600] Speed: 20389.05 samples/sec Train-accuracy=0.993594
INFO:root:Epoch[9] Batch [700] Speed: 21249.39 samples/sec Train-accuracy=0.990938
INFO:root:Epoch[9] Batch [800] Speed: 20963.81 samples/sec Train-accuracy=0.992500
INFO:root:Epoch[9] Batch [900] Speed: 20660.02 samples/sec Train-accuracy=0.993594
INFO:root:Update[9371]: Change learning rate to 5.00000e-03
INFO:root:Epoch[9] Train-accuracy=0.996622
INFO:root:Epoch[9] Time cost=2.942
INFO:root:Saved checkpoint to "./model/mnist-0010.params"
INFO:root:Epoch[9] Validation-accuracy=0.977110
1
2
3
4
5
6
7
8
9
10
11
12
13
14
15
使用GPU_0输出:
INFO:root:Epoch[9] Batch [100] Speed: 80014.86 samples/sec Train-accuracy=0.989944
INFO:root:Epoch[9] Batch [200] Speed: 77859.06 samples/sec Train-accuracy=0.991719
INFO:root:Epoch[9] Batch [300] Speed: 77274.97 samples/sec Train-accuracy=0.992500
INFO:root:Epoch[9] Batch [400] Speed: 83239.16 samples/sec Train-accuracy=0.992812
INFO:root:Epoch[9] Batch [500] Speed: 76457.95 samples/sec Train-accuracy=0.992188
INFO:root:Epoch[9] Batch [600] Speed: 75504.60 samples/sec Train-accuracy=0.993594
INFO:root:Epoch[9] Batch [700] Speed: 79716.89 samples/sec Train-accuracy=0.992500
INFO:root:Epoch[9] Batch [800] Speed: 77644.66 samples/sec Train-accuracy=0.991563
INFO:root:Epoch[9] Batch [900] Speed: 80026.07 samples/sec Train-accuracy=0.992188
INFO:root:Update[9371]: Change learning rate to 5.00000e-03
INFO:root:Epoch[9] Train-accuracy=0.991976
INFO:root:Epoch[9] Time cost=0.777
INFO:root:Saved checkpoint to "./model/mnist-0010.params"
INFO:root:Epoch[9] Validation-accuracy=0.973029

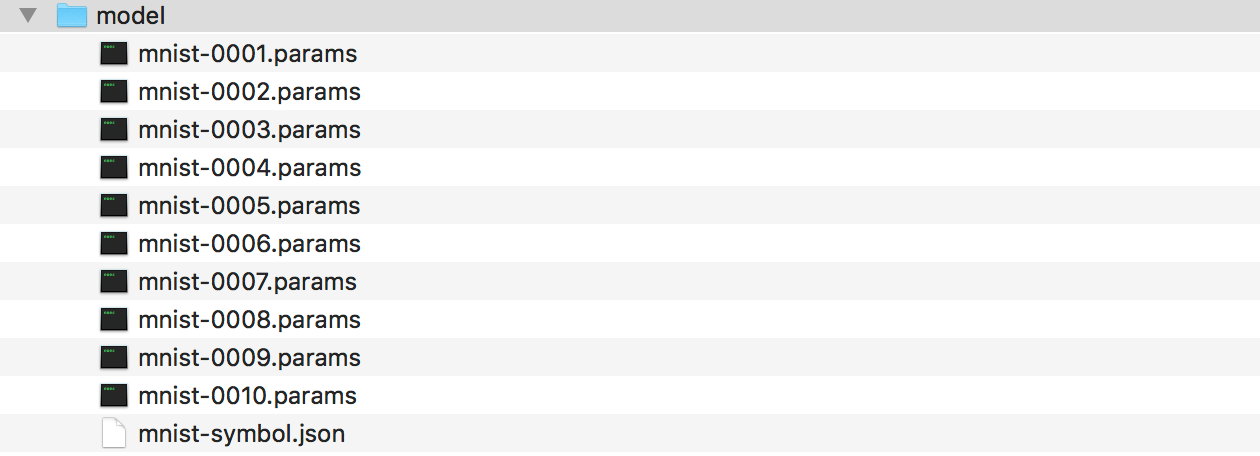
可以看到,相对于CPU,GPU版本耗时更低。最终训练得到我们的模型及参数:

特征输出

1
2
3
4
5
6
7
8
9
10
11
12
13
14
15
16
17
18
19
20
def main():
parser = argparse.ArgumentParser()
parser.add_argument('--model-prefix', default='./model/mnist', help='The trained model')
parser.add_argument('--epoch', type=int, default=10, help='The epoch number of model')
parser.add_argument('--batch-size', type=int, default=1, help='the batch size')
args = parser.parse_args()
#数据准备
test_data = get_mnist_iter(args)
#模型加载
model_load = mx.model.FeedForward.load(args.model_prefix, args.epoch)
#获取网络结构的输出
internals = model_load.symbol.get_internals()
print internals.list_outputs()
#获取到relu2_output层的网络模型
feature_symbol = internals["relu2_output"] # need to know the feature name
feature_extractor= mx.model.FeedForward(ctx=mx.cpu(),symbol=feature_symbol,
arg_params=model_load.arg_params,aux_params=model_load.aux_params,allow_extra_params=True)
#获取relu2_output的特征输出
feature = feature_extractor.predict(test_data)
print feature[0]

输出结果如下:

1
2
3
4
5
6
7
8
9
10
11
12
['data', 'flatten0_output', 'fc1_weight', 'fc1_bias', 'fc1_output', 'relu1_output', 'fc2_weight', 'fc2_bias', 'fc2_output', 'relu2_output', 'fc3_weight', 'fc3_bias', 'fc3_output', 'softmax_label', 'softmax_output']
#输出relu2_output的64维特征
[ 0. 0. 0.5445559 0. 0.59460354 0. 0.
0. 3.02587748 0. 0. 0. 0. 0.
4.65842295 0. 0. 1.21603107 0. 5.51738167
1.03430629 4.18610001 0. 0. 0. 3.42717886
0.39659438 0. 4.57145691 0.54060239 0. 0.
0.46630788 0. 0. 0. 0. 3.33872557
1.78779721 0. 0. 0. 0. 2.68493319
0. 0.12271087 0. 0.53863102 0.24742702 0. 0.
0. 0. 0. 0. 0.03649367 0. 0.
1.67668664 0. 0. 0. 0. 0. ]

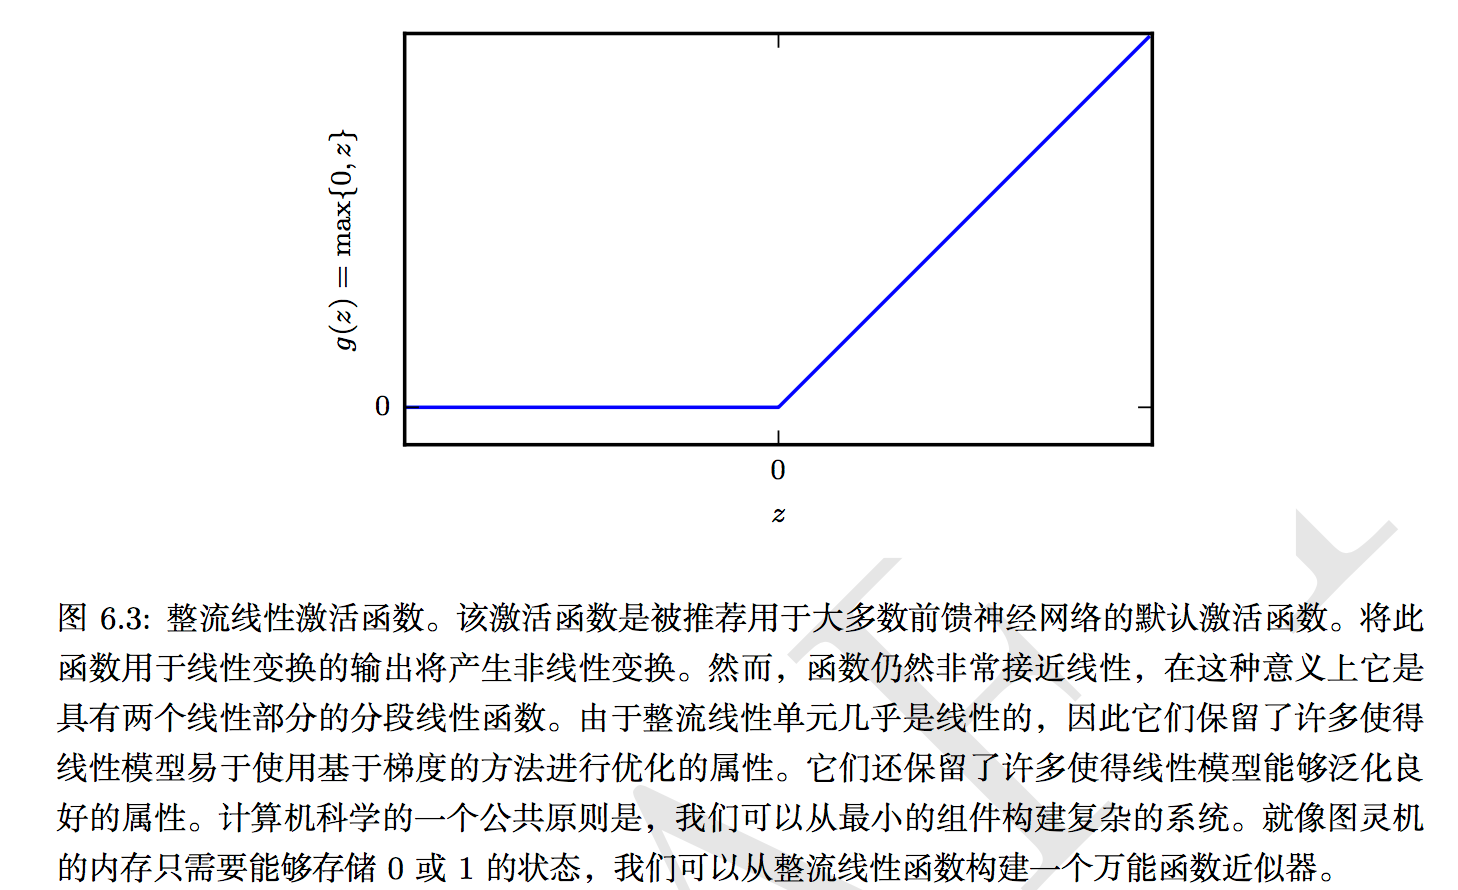
网络模型中采用了整流线性单元(rectified linear unit)relu激励函数,其具体表现如下:
我们可以输出fc2_output层特征:

1
2
3
4
5
6
7
8
9
10
11
[-2.34680581 -2.9376297 0.5445559 -2.19239593 0.59460354 -0.80681509
-0.23546398 -1.56209314 3.02587748 -4.98715925 -0.45300293 -2.92229438
-0.34418809 -0.16466188 4.65842295 -2.402004 -3.09535432 1.21603107
-0.18831354 5.51738167 1.03430629 4.18610001 -1.49699688 -0.18430832
-0.05091106 3.42717886 0.39659438 -0.49219307 4.57145691 0.54060239
-1.13287854 -1.48080015 0.46630788 -1.45213461 -2.1068604 -5.25248671
-0.73300338 3.33872557 1.78779721 -2.6239779 -0.06462583 -1.10023999
-0.20267248 2.68493319 -1.95770514 0.12271087 -3.41951561 0.53863102
0.24742702 -0.82332844 -0.1143466 -1.77568805 -3.64029336 -3.30620718
-1.41650629 0.03649367 -4.13601732 -2.01355672 1.67668664 -2.32042742
-2.40070701 -2.09729385 -0.95457876 -1.52970195]

可以看到从fc2_outputrelu2_output的特征变化符合relu激活函数变化结果。
symbol型变量act_type可选三种激活函数{'relu', 'sigmoid', 'tanh'}, 针对该应用场景,当激活函数为sigmoid时,训练结果相差不大;当激活函数为tanh时,10个epoch的validation为0.799左右,80个epoch的validation为0.947。

结果预测

1
2
3
4
5
6
7
8
9
10
11
12
13
14
15
16
17
18
19
20
21
22
23
24
25
26
27
28
def main():
parser = argparse.ArgumentParser()
parser.add_argument('--model-prefix', default='./model/mnist', help='The trained model')
parser.add_argument('--epoch', type=int, default=10, help='The epoch number of model')
parser.add_argument('--batch-size', type=int, default=64, help='the batch size')
args = parser.parse_args()
#获取测试数据,并生成数据迭代器
test_data = get_mnist_iter(args)
#加载模型
model_load = mx.model.FeedForward.load(args.model_prefix, args.epoch)
#结果预测
outputs, data, label = model_load.predict(test_data, return_data = True)
correct_count = 0.0
error_count = 0.0
print "outputs.shape: " + str(outputs.shape)
print ('*'*30)
for i in range(0, outputs.shape[0]):
predict_label = np.argmax(outputs[i])
if label[i] == predict_label:
iscorrect = True
correct_count = correct_count + 1.0
else:
iscorrect = False
error_count = error_count + 1.0
if i < 100:
print "max_output: %f predict_label: %d ori_abel: %d result: %s"%(np.max(outputs[i]), predict_label, label[i], iscorrect)
acc = correct_count/(correct_count + error_count)
print "predict accuracy: " + str(acc)

预测结果输出如下:

1
2
3
4
5
6
7
8
9
10
11
outputs.shape: (10000, 10)
******************************
max_output: 0.999939 predict_label: 8 ori_abel: 8 result: True
max_output: 0.999999 predict_label: 2 ori_abel: 2 result: True
max_output: 1.000000 predict_label: 0 ori_abel: 0 result: True
max_output: 0.362673 predict_label: 9 ori_abel: 2 result: False
max_output: 0.999989 predict_label: 9 ori_abel: 9 result: True
...
max_output: 0.759377 predict_label: 9 ori_abel: 9 result: True
max_output: 1.000000 predict_label: 5 ori_abel: 5 result: True
predict accuracy: 0.9734
如果觉得我的文章对您有用,请随意赞赏